Autopilot mode
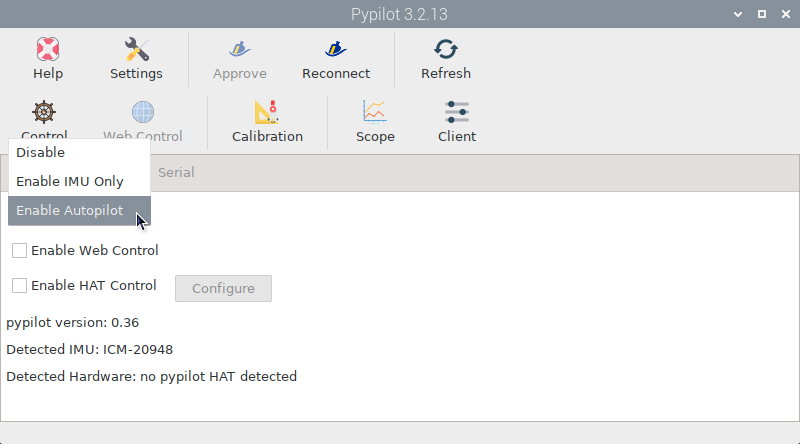
Enable this mode in the  Services tab only if you are using a Pypilot motor controller:
The motor controller can be purchased from the official Pypilot store.
You also need one of the IMUs recommended in the previous chapter. Do not forget to calibrate.
As a motor you can use the one from your old autopilot if it still works or an industrial equivalent like these replacements for the Raymarine Q047, the EV-100/SPX-5 or the ST4000+. But you can also use other types of motors that are not normally used in marine environments.
Finally you might also need the Pypilot HAT to control the autopilot although this element is optional because you have other ways to control it as we will see later. The Pypilot HAT can be purchased from the official Pypilot store.
Connecting the motor controller
On one side you have to connect the controller to the motor and on the other side to one of the UART ports of the Raspberry Pi following this scheme:
Pypilot motor controller |
Raspberry Pi |
|
|---|---|---|
Vcc |
3V3 |
|
RxD |
UART TX |
|
TxD |
UART RX |
|
GND |
GND |
|
You can use any of the available UART interfaces on your Raspberry Pi model. See the UART chapter to find out which one to choose.
In the following example we are going to use the UART0 interface which is the only one available for both the Raspberry Pi 3 and 4 models. Go to the  OpenPlotter Serial app and click the
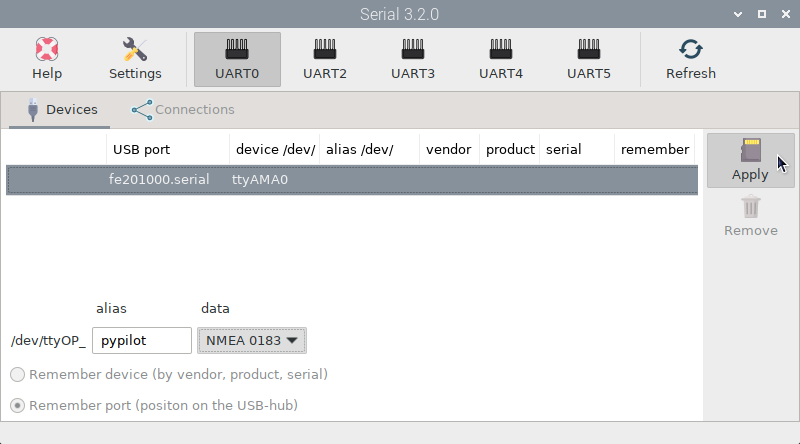
UART0 button, acknowledge the warning and reboot. After the reboot, launch the OpenPlotter Serial app again. On the Devices tab, you should now see a new entry. Select the line with ttyAMAx, give it an alias (for example pypilot) and select NMEA 0183 from the data dropdown, then press 
Apply:
Finally we need to connect the ttyOP_pypilot device to Pypilot. Switch to the 
Connections tab, select the ttyOP_pypilot device and click 
Add to Pypilot:

In the next window click AUTO and that is it. The motor controller will be ready to receive orders from Pypilot.
Feeding data to autopilot
Pypilot receives data from the IMU and forwards it to the Signal K server automatically when we steer in compass mode using the magnetic heading as reference.
We can also steer in GPS mode, using the course over ground as reference, or in wind mode and true wind mode, keeping the apparent wind angle or the true wind angle respectively. In these cases, Pypilot will get the necessary data from the Signal K server automatically when these devices are defined there. If we want to decrease the latency of this data we can also add these devices directly to Pypilot using the OpenPlotter Serial app in the same way that we have added the motor controller. Pypilot will take care of sending the data from these devices also to the Signal K server so that other programs can use them.
Autopilot control

Once we have connected the hardware and we are feeding Pypilot with the necessary data, we can start to control our autopilot using any of the available interfaces. All interfaces can be used in parallel and have all the options you would normally find on any autopilot.
Only one of them is physical and the rest are virtual. The virtual control interfaces can be used from the same device running OpenPlotter and two of them can also be used remotely from other devices, such as a mobile phone connected to the same network as OpenPlotter. The physical control interface, the Pypilot HAT, can also be used remotely via an infrared remote control.
All control interfaces share the same options and parameters that we will briefly explain later.
 Control
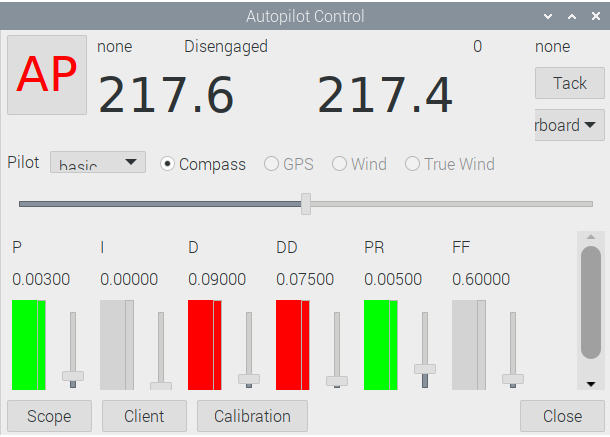
You can access this virtual interface only from the system running OpenPlotter by clicking the Control icon in the OpenPlotter Pypilot app.
 Web Control
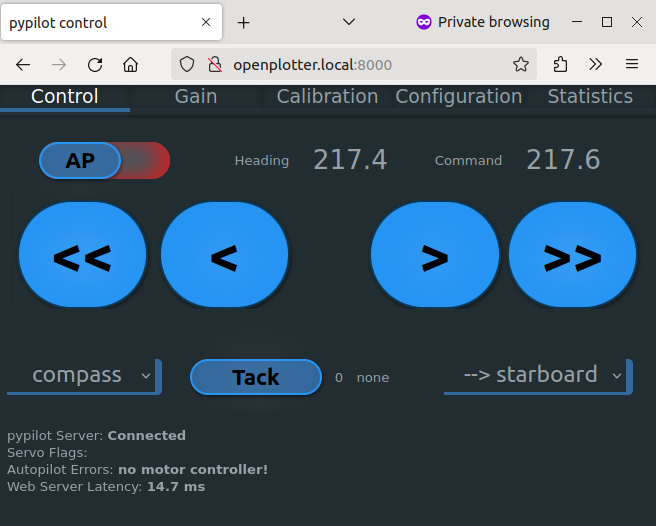
You can access this virtual interface from the system running OpenPlotter by clicking the Web Control icon in the OpenPlotter Pypilot app or by typing the address https://localhost:8000 in the browser. Before you can use this interface you need to activate it in the Services tab, checking the Enable Web Control option.
You can also use this interface remotely from any device connected to the same network as your OpenPlotter system by typing the address https://openplotter.local:8000 in the browser.
 OpenCPN plugin
You can access this virtual interface from the system running OpenPlotter by installing and enabling the pypilot plugin in OpenCPN. Before you can use this interface, you must connect pypilot by clicking Config and supplying the host. The host is localhost when your pypilot instance runs on the same system as OpenCPN or openplotter.local when your pypilot instance runs on another system on the same network.
Pypilot HAT
This is the physical interface of Pypilot. It basically consists of a small LCD digital screen, a small keyboard and an infrared sensor for a remote control. Before you can use this interface you need to activate it in the Services tab, checking the Enable HAT Control option.
Pypilot should automatically detect the HAT. You can modify some parameters by clicking the Configure button or by typing the address https://localhost:33333 in the browser. Note that the web interface at port 33333 has a startup delay of 30 seconds.
Parameters
These are some of the parameters that you will find in all control interfaces:
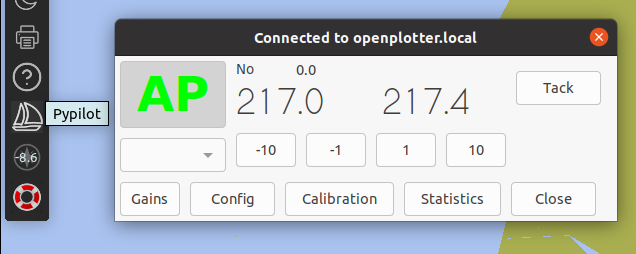
- AP:
The AP button is the equivalent of the physical button panel known from boat autopilots. When AP is green, the autopilot is on and when the AP button is red, the autopilot is in standby mode.
- Heading:
[Heading - Command] On all control interfaces you will see two numeric values from 0 to 360 expressed in degrees. One of them is the current heading, which can be calculated differently depending on the selected mode as we will see in the next point, and the other is the command heading, which is the desired heading. When AP is on and green, pypilot will steer until the current heading is similar to the command heading.
- << < > >>:
[-10 -1 1 10] When AP is in standby mode you will see four arrow buttons which can be used to align your actuator with your rudder so you can engage it and if you are lazy you can also steer the boat with them. When AP is enabled, these buttons will have numerical values -10, -1, 1 and 10 to add those amounts in degrees to the command heading.
- Mode:
[Compass - GPS - Wind - True Wind] In Compass mode the current heading is based on magnetic north, in GPS mode the current heading is based on true north, in Wind mode the current heading is the direction the wind comes from relative to the bow and in True Wind mode the current heading is the direction the wind comes from relative to the true north. You will find a more detailed explanation in the Pypilot functions chapter of the workbook.
- Tack:
[starboard - board] Sailing with a limited crew sometimes requires a system to automate tacking. Clicking the Tack button initiates the maneuver to port or starboard using the predefined settings:
ap.tack.angle: In wind mode it is automatically determined from current course. Unit is degrees.
ap.tack.delay: How many seconds to wait to tack after hitting tack button.
ap.tack.rate: How quickly to tack. Unit is degrees/sec.
ap.tack.threshold: When to revert back to normal filter. Unit is percentage. Typically half the tack angle but adjusting this would be useful to prevent overshoot.
- Gain:
[P - I - D - DD - PR - FF] Gains of the steering mechanism determine reactiveness of the steering and suppression of overshoot. The values of these gains are different for each boat, so they need to be set properly. To get started retuning from scratch (or on a new boat) set all of the gains to zero, except the P and D gains. It is possible to have a fully usable (but less efficient) autopilot using only these two gains. You will find a more detailed explanation in the official docs.
- Calibration:
The compass (IMU) must be calibrated. If you have a rudder feedback sensor, with analog input to the motor controller, it must also be calibrated. The rudder range should first be set to the maximum angle the autopilot is allowed to move the rudder. The angle is needed to provide accurate rudder feedback measurements. For example the opencpn dashboard display. Next, manually turn the rudder for, centered, starboard range, port range and press the button each time.
- Settings:
In addition to the tack settings there are many other parameters that can be modified. You can access these settings from the Configuration option of the control interfaces or from within the Calibration option. You will find a more detailed explanation in the parameters chapter of the workbook.
- Client:
In some control interfaces you will find a Client button to access a list of parameters with their current values to know what is happening in your system at any time. In this list you can also modify some values.
- Scope:
In some control interfaces you will also find a Scope button to access a graphical representation of all Pypilot parameters and their current values.